01 Apr 2026
Citrix Workspace for Ubuntu ships as a hefty .deb file (currently at 431 MB).
Even if you say no to all its optional components (deviceTRUST etc.), there still is quite some bloat left.
If you’re in a hurry, I (not entirely myself) made a shell script to do all the steps below. It makes some Debian / Ubuntu assumption!
curl https://bartbroere.eu/downloads/citrix_cleanup.sh | bash
The first thing that can be disabled is ctxcwalogd, a Citrix log writer service that wants to run permanently:
sudo systemctl disable ctxcwalogd
sudo service ctxcwalogd stop
If you have a running Citrix Workspace connection you’ll probably have these binaries running:
/opt/Citrix/ICAClient/wfica/opt/Citrix/ICAClient/adapter/opt/Citrix/ICAClient/icasessionmgr.
After you close the connection the first two will disappear, but the last one (icasessionmgr) will keep running.
That’s not necessary as far as I’m concerned, and I don’t believe there’s a way to configure Citrix Workspace not to do that.
To fix it I replaced the wfica binary with a wrapper script that cleans up after it:
# first move the original binary to a new location
sudo mv /opt/Citrix/ICAClient/wfica /opt/Citrix/ICAClient/wfica_
Now create the file /opt/Citrix/ICAClient/wfica and have it contain something like this:
#!/usr/bin/env bash
/opt/Citrix/ICAClient/wfica_ "$@"
pkill -f icasessionmgr
Make it executable:
sudo chmod +x /opt/Citrix/ICAClient/wfica
This wraps the wfica binary and makes it clean up the icasessionmgr after it’s done.
The changes you have to make may be different if you don’t use the wfica part of Citrix Workspace, but something like the CEB (Citrix Enterprise Browser).
Of course these two changes are nothing special, but they make Citrix behave a bit better on your system.
If you discover other ways Citrix sticks around, feel free to let me know!
06 Mar 2025
Try the Pyodide REPL as a single HTML file here! (for now only works on non-Chromium browsers)
Most WASM that currently runs in browsers is served as a separate file.
This doesn’t have to be the only way, however.
What if you could inline it similar to how Javascript can be inlined?
You would pack everything in a single HTML file, and only have to ship that one file.
What complicates inlining WASM is that it is a binary blob.
You need to base64 encode it to “inline” it in an HTML file.
But methods like Webassembly.Instantiate don’t accept base64 directly.
Fortunately, since around December 2024 Firefox and Safari have the Uint8Array.fromBase64() method.
The Ladybird browser also offers this method.
And for the other browsers that don’t have it, we could load a polyfill or rely on window.btoa.
To get a feel for the performance of a real WASM project when inlined, I chose Pyodide (CPython compiled to WASM).
I prettified a Pyodide build, debugged it and looked for where the code downloaded and instantiated WASM objects and some other binary objects.
In those places I referred to a base64 string instead.
This Javascript, now containing base64 strings, is then inlined into the HTML file.
The automated hack to do this for the Pyodide project is in this Python script.
This script is definitely not a universal tool for inlining WASM, and I don’t even plan to maintain it for Pyodide builds!
One piece of code before and after the inlining looked like this:
- let n;
- i
-   ? (n = await WebAssembly.instantiateStreaming(i, r))
-   : (n = await WebAssembly.instantiate(await t, r));
+ let n = await WebAssembly.instantiate(Uint8Array.fromBase64(
+   "base64 string of pyodide.asm.wasm omitted here"
+ ), r);
In another place I replaced a zip download with an inlined version of the zip file:
- async function G(e, t) {
+ async function G(e, t) {
+   if (e.endsWith('python_stdlib.zip')) { return Uint8Array.fromBase64(
+     "base64 string of python_stdlib.zip omitted here"
+   }
 My gut feeling said that this inlined WASM might compress quite well.
I didn’t benchmark it thoroughly, but seeing it in action I’m not disappointed.
Especially when the server can send a compressed version of the HTML, the startup time and memory footprint aren’t negatively impacted that much.
The console.html file with everything inlined is 6 MB when brotli compressed, and almost 11 MB when gzipped.
Without any compression it currently weighs around 30 MB.
But why?
I think that it really can be a benefit to ship software as a single HTML file.
It could be a solution if you want to run WASM, but you’re in an environment where you can only open HTML files that are on disk, and don’t have the possibility of serving them.
Opening the unmodified console.html from a local filesystem will give you all kinds of CORS errors in your console:
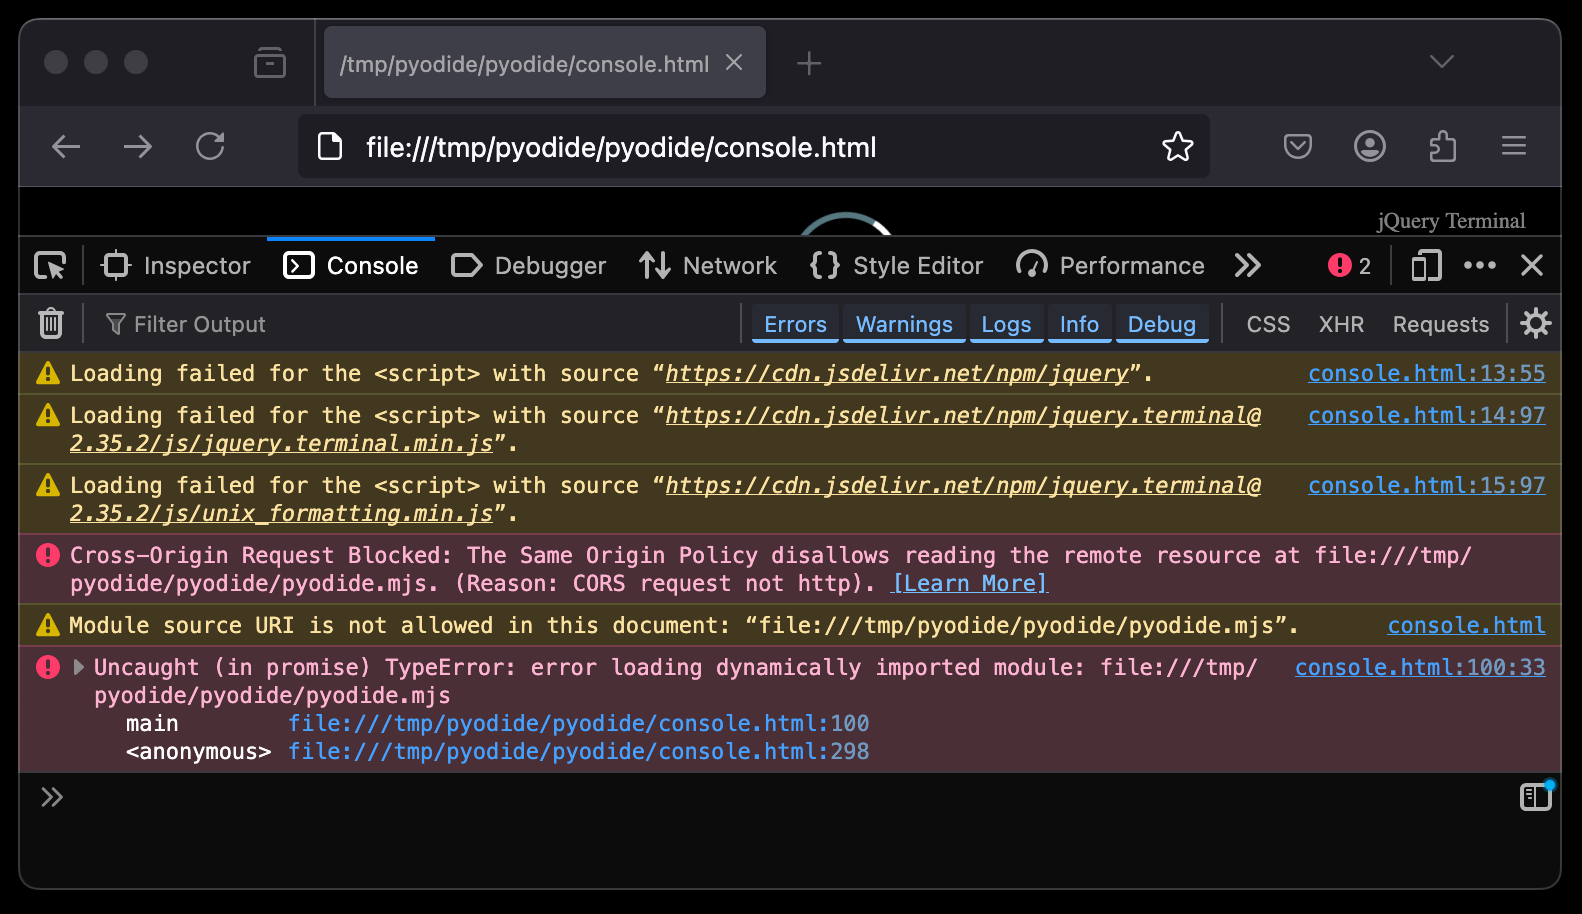
But when everything is included in the same file, there are no other attempted requests.
And no other requests means no CORS issues!
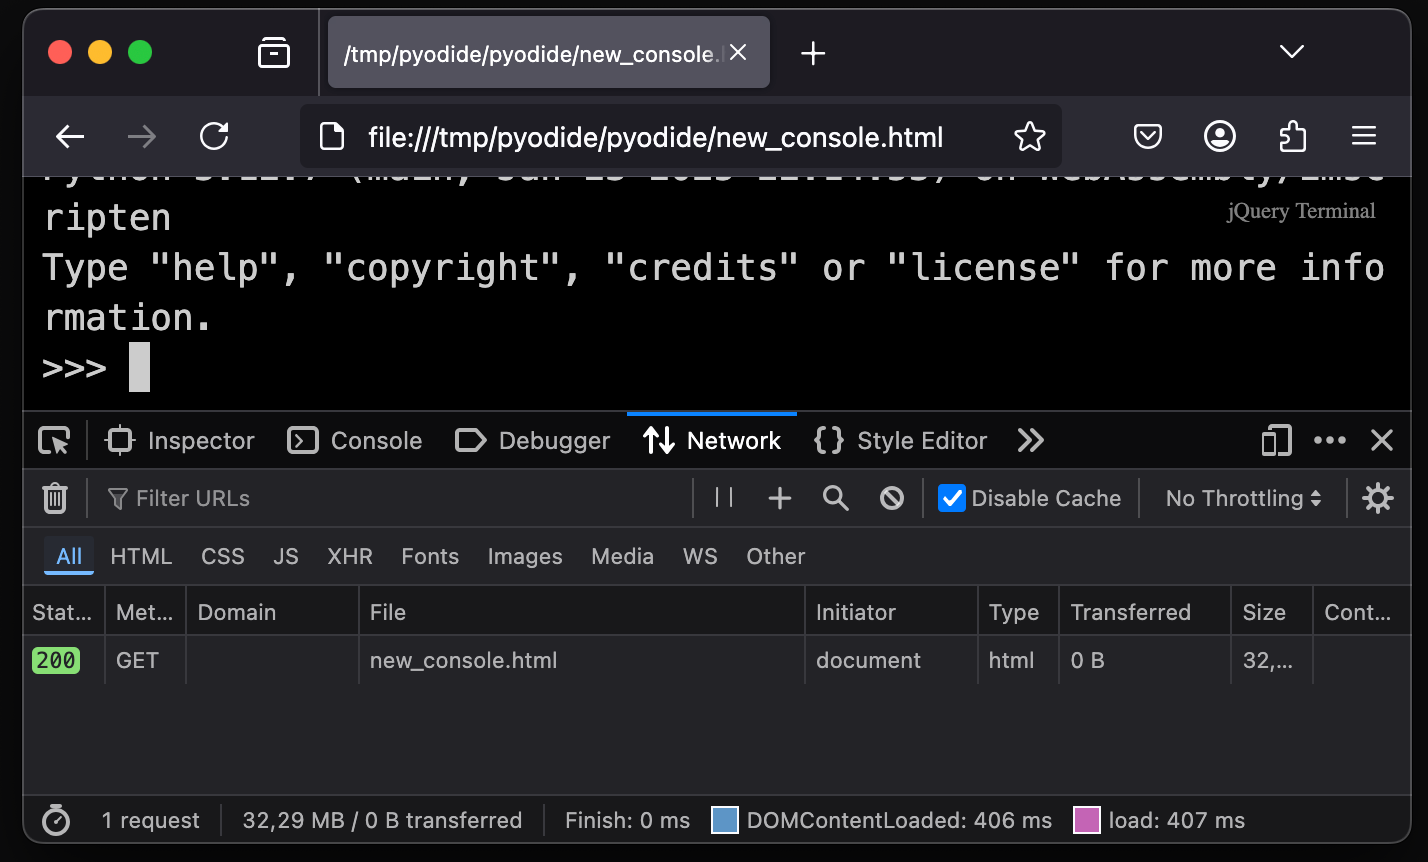
So you can ship entire applications as a single HTML file, and all that people need to have is a web browser.
Even in the most restrictive environments where you can’t install anything, you often do have a browser.
There is still a lot that can be done.
To make the HTML smaller (before over-the-wire compression), I used Base122 encoding.
This is an efficient encoding that uses UTF-8 characters, and only inflates the size of the encoded payload by around 14%.
A variation of the WASM inlining script with base122 can be found here: inline_wasm_b122.py.
Getting a bit distracted I made the base122 Python package.
There were already Python implementations of base122, but I wanted one that behaves like the builtin base64 package.
As a future project I would like to be able to ship the Jupyter Lite project as a single HTML file.
Jupyter Lite is a variant of Jupyter that can use Pyodide as a kernel, and can be statically hosted.
Merging this application into one HTML file will be more challenging, since it is a bigger and more complex application.
The build setup also needs to be a lot less brittle than done here.
In this upcoming Jupyter Lite HTML file, I’ll also try to include all the Python packages that are included with Pyodide, so you’ll get a fully featured Python development environment in a single HTML file.
Given the size of the current Pyodide builds, multiplied by the 1.14 factor of Base122 encoding, it will be at least around 400 MB.
27 Jan 2025
TLDR: I found ResizableChannel in github.com/eapache/channels and used it to dynamically change the number of goroutines running at the same time
For a CPU intensive and parallel task I needed a solution to be able to throttle it.
During the day it should simmer and use one core, not to disturb other running processes, but during the night it could use a lot more cores.
Since it was written in Go, and already used goroutines, I decided to dynamically limit the number of goroutines running at the same time.
I’m aware that number of goroutines is not necessarily the same as the number of cores used, but I’ll use them interchangeably anyway.
In my code, they were roughly the same.
Golang’s recommended way is to use a limit on a group.
This is challenging, because the documentation says you can (should) not change the limit while goroutines are running.
If you want to change it, you should wait until all concurrent goroutines are done, change it, and continue with the new limit.
Depending on your use case this is probably not ideal.
A second pattern Go programs often use is a channel with a limit; a buffered channel.
By limiting the number of slots in the channel, and getting them out once the goroutine is done, it automatically limits the number of concurrent goroutines.
On Go’s default chan it’s not possible to change the size, however.
I’ve slightly modified the example from the Go Wiki.
The below example shows how a buffered channel would typically limit the number of running goroutines.
package main

import (
	"runtime"
)

var goroutineLimit = make(chan struct{}, runtime.NumCPU())

func Serve(queue chan *Request) {
	for {
		goroutineLimit <- struct{}{} // Block until there's capacity
		req := <-queue
		go handle(req)
	}
}

func handle(r *Request) {
	process(r)       // May take a long time & use a lot of memory or CPU
	<-goroutineLimit // Done; enable next request to run.
}
This is almost what I need. If only the Go channel was resizable…
What felt like a naive approach: googling for a Go channel alternative, but make it resizable, actually yielded results.
The library github.com/eapache/channels offers just that, a ResizableChannel implementation.
While this library says it’s no longer maintained, I didn’t encounter any issues using the current Go runtime.
It builds, and the built executables didn’t panic.
Go code can sit untouched for years and still work fine.
Below are the changes that you should make to switch to ResizableChannel:
 package main

 import (
+	"github.com/eapache/channels"
 	"runtime"
 )

-var goroutineLimit = make(chan struct{}, runtime.NumCPU())
+var goroutineLimit = channels.NewResizableChannel()

 func Serve(queue chan *Request) {
+	goroutineLimit.Resize(channels.BufferCap(runtime.NumCPU())) // Initial channel size
 	for {
-		goroutineLimit <- struct{}{} // Block until there's capacity
+		goroutineLimit.In() <- struct{}{} // Block until there's capacity
 		req := <-queue
 		go handle(req) // Don't wait for handle to finish.
 	}
 }

 func handle(r *Request) {
-	process(r)       // May take a long time & use a lot of memory or CPU
-	<-goroutineLimit // Done; enable next request to run.
+	process(r)             // May take a long time & use a lot of memory or CPU
+	<-goroutineLimit.Out() // Done; enable next request to run.
 }
Note that the diff above doesn’t have a way of actually changing the channel size yet.
How you communicate that the number of concurrent goroutines should change depends on your use case.
You could consider doing it with gRPC, but it’s also possible to run a simple webserver that accepts a number as GET parameter.
Here’s a server that you could start early in your program that would do the latter:
go func() {
	log.Println("Starting web server on port 8080...")
	http.HandleFunc("/resize", func(w http.ResponseWriter, r *http.Request) {
		var newSize int
		if r.Method != http.MethodGet {
			http.Error(w, "Invalid request method", http.StatusMethodNotAllowed)
			return
		}
		sizeParam := r.URL.Query().Get("new_size")
		if sizeParam == "" {
			return
		}
		newSize, err := strconv.Atoi(sizeParam)
		if err != nil || newSize <= 0 {
			http.Error(w, "Invalid 'new_size' parameter", http.StatusBadRequest)
			return
		}
		goroutineLimit.Resize(channels.BufferCap(newSize))
		// log.Printf("Resized goroutine limit to %d", newSize)
		w.WriteHeader(http.StatusOK)
	})
	if err := http.ListenAndServe(":8080", nil); err != nil {
		log.Fatalf("Failed to start web server: %v", err)
	}
}()
After creating this solution to dynamically limit the number of concurrent goroutines, I read an interesting discussion about using weighted Semaphores to achieve more or less the same.
There has also been an effort to make Golang’s own weighted Semaphore implementation resizable, but this has not been merged.
In the end this feature was not included in the default Semaphore implementation.
The discussion references that the quotapool package by cockroachdb might be a solution.
I didn’t look into that too much, since it is a bit more complicated.
It can deal with heterogeneous work units, and I simply don’t need that.
Each of my tasks consumes one core fully (but briefly), and always takes about the same time.
I like this solution because it only requires a few lines of changes in existing code.
(Plus some logic to change the capacity of the channel, but how to handle that will vary on your situation).
It could still be better in one way:
if the resizable channel actually has meaningful variables in it, instead of empty structs.
By actually communicating useful items it would function as a “proper” channel instead of as a locking hack.
14 Nov 2024
TLDR: Stripping metadata from a Microsoft Office file can be done with a single 7-zip command:
7z d file.docx "docProps/*"
When you save a docx file, it can contain metadata like the author, title, and comments.
On StackOverflow, a user asked how to remove this metadata.
One of the answers was useful to me, but it didn’t strip all the metadata and replaced some fields with the wrong data type.
It uses the python-docx library, so you would need to pip install that first.
This library knows that a docx is a zip in a trenchcoat, and can modify the XML in this zip inplace.
I’ve modified the answer to set all metadata fields to an empty or null-ish value.
from datetime import datetime

from docx import Document

document_path = 'example.docx'

# Strip metadata
document = Document(document_path)
metadata_fields = {
    "author": str,
    "category": str,
    "comments": str,
    "content_status": str,
    "created": lambda: datetime(2000, 1, 1),
    "identifier": str,
    "keywords": str,
    "language": str,
    "last_modified_by": str,
    "last_printed": lambda: datetime(2000, 1, 1),
    "modified": lambda: datetime(2000, 1, 1),
    "revision": int,
    "subject": str,
    "title": str,
    "version": str,
}

for meta_field, factory in metadata_fields.items():
    setattr(document.core_properties, meta_field, factory())

# Save the document
document.save(document_path)
The snippet above was my preferred way of removing metadata for quite some time.
However, when creating a document with WordPad I noticed it didn’t even create a docProps directory at all.
So it seems this entire directory is optional for the specification, and therefore optional to be a valid docx file.
That means we don’t have to bother with changing the XML in the file at all.
With a single command we can delete all metadata (including fields like edit duration of the document).
7z d file.docx "docProps/*"
On Windows you the 7-zip command line tool can be named 7z.exe instead, and it might not be on your PATH.
This command also works for other Microsoft Office tools like Excel or Powerpoint:
7z d file.xlsx "docProps/*"
7z d file.pptx "docProps/*"
Excel files can contain edit history, which may contain some data you might want to delete too.
This is especially important if you’re trying to commit academic fraud.
So if you want to be certain that some information is no longer in your file, extract your file and grep around for it.
After you’ve done this, you might be tempted to check if you have not accidentally corrupted the file.
Note that if you do that, and you accidentally save it, you have re-introduced the docProps directory.
As a final warning, know that 7zip will not ask if you’re sure about the command, so you may lose work.
24 Jul 2024
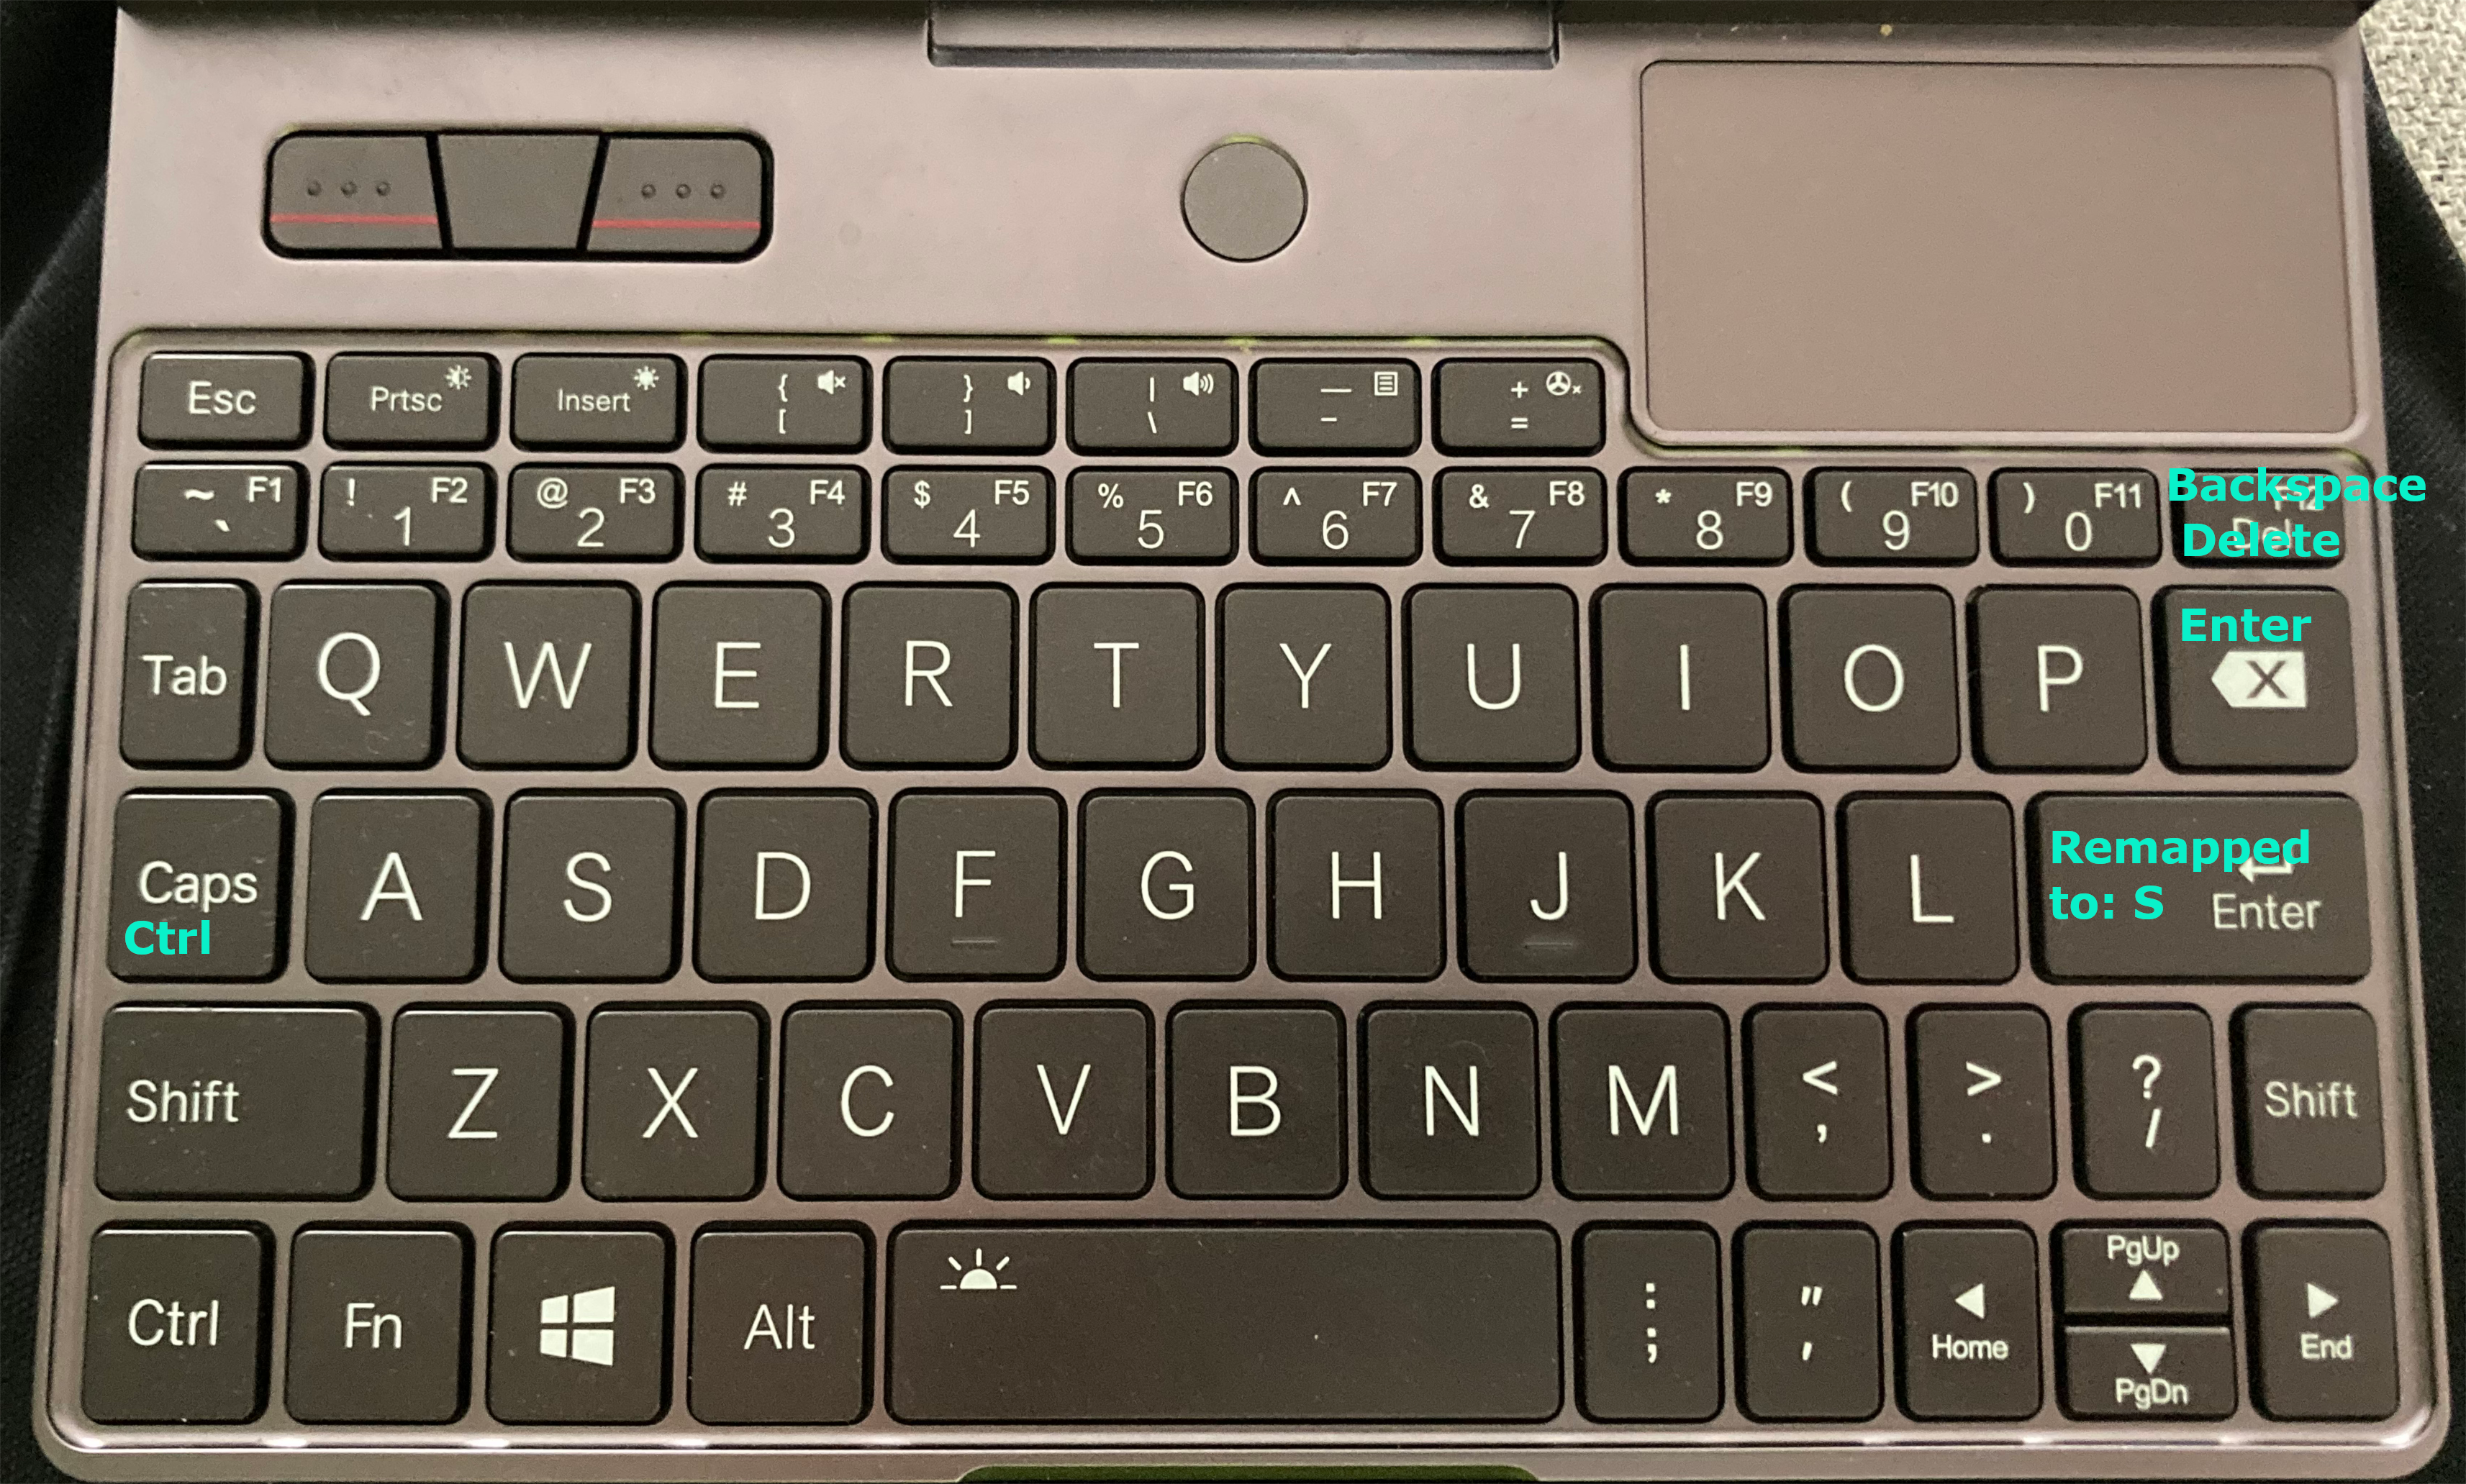
If you’re used to the Dvorak keyboard layout, you might have a hard time using the GPD Pocket 3.
In a QWERTY layout the ; is to the right of the L.
GPD moved this to the right of the spacebar on the Pocket 3.
The location of the ; is used for the letter s in the Dvorak layout.
That means a very frequently used letter is no longer on the home row, defeating the purpose of the Dvorak layout quite
a bit.
This was done on Ubuntu 24.04. Your experience on other Linux distributions might vary.
I found the following remapping quite easy to get used to:
- Enter becomes the letter S
- Backspace is the new Enter
- Delete is now backspace
- Shift + Delete is the delete action
(Although not related to the GPD Pocket 3 specifically I also remapped Caps Lock to Control.)
Note that these changes are applied on top of simply switching to the Dvorak layout:
| Original layout |
Changes on top of setting the layout to Dvorak |
 |
 |
In practice this results in the following changes to the file /usr/share/X11/xkb/symbols/pc config file.
--- pc.bak	2024-05-14 08:04:51.859190653 +0200
+++ pc	2024-05-14 08:54:16.902085341 +0200
@@ -4,11 +4,11 @@

     key  <ESC> {[  Escape  ]};
     key  <TAB> {[  Tab,  ISO_Left_Tab  ]};
-    key <CAPS> {[  Caps_Lock  ]};
+    key <CAPS> {[  Control_R  ]};

-    key <BKSP> {[  BackSpace,  BackSpace  ]};
+    key <BKSP> {[  Return  ]};
     key <BKSL> {[  backslash,  bar  ]};
-    key <RTRN> {[  Return  ]};
+    key <RTRN> {[  s, S  ]};

     // The extra key on many European keyboards:
     key <LSGT> {[  less,  greater,    bar,  brokenbar  ]};
@@ -59,7 +59,7 @@
     key <PAUS> {[  Pause,  Break  ], type="PC_CONTROL_LEVEL2" };

     key  <INS> {[  Insert  ]};
-    key <DELE> {[  Delete  ]};
+    key <DELE> {[  BackSpace, Delete  ]};
     key <HOME> {[  Home    ]};
     key  <END> {[  End     ]};
     key <PGUP> {[  Prior   ]};
Note that this configuration only takes effect in X.
Your remap does not apply yet for example when booting and unlocking the full disk encryption.
The configuration change also does not survive some updates, so you might need to restore it from time to time.
It might be better to achieve the same results with xmodmap.
I have not yet done this successfully though.
If my current solution of modifying the XKB config gives problems, I might try xmodmap next.
